Core and Hip Linkage: Lower Body Stabilization (Phase 2) Exercises
Step-by-step home exercise guide for core and hip linkage to integrate lower body stabilization and reduce shoulder force requirements.
Rehabilitating a shoulder injury is not just about strengthening the shoulder itself. In biomechanics, the body operates as a "kinetic chain"—a linked system where movement in one part affects another. When performing overhead or reaching tasks, more than 50% of the total force is generated by your lower body and core. If your hips and torso are weak or unstable, your shoulder must work twice as hard to compensate, leading to overload, fatigue, and reinjury. Integrating lower body stabilization into your routine offloads the shoulder, reducing the total force requirements on the joint and facilitating recovery.
General Guidelines & Safety Precautions
To ensure a safe and effective rehabilitation session, follow these general guidelines:
- Warm-up: Spend 5 to 10 minutes doing light cardiovascular activity (like walking) and gentle arm swings before starting.
- The Pain Rule: Exercises should feel challenging but not painful. If you feel sharp, pinching, or sudden pain in the shoulder, stop the exercise immediately.
- Control over Speed: Focus on slow, deliberate movements. Never use momentum to lift weights or stretch bands.
- Posture: Keep your chest tall, shoulders relaxed (avoid shrugging), and your core engaged throughout each movement.
Exercise 1: Half-Kneeling Band Pallof Press with Shoulder Raise
Purpose: Integrates core rotational stability with vertical shoulder control, teaching the torso to resist movement while the shoulder operates.
Equipment Needed: A light-to-medium resistance band anchored securely at chest height.
Starting Position: Kneel on one knee (the knee closer to the band's anchor point) with the opposite foot flat on the floor in front of you. Hold the band with both hands at the center of your chest.
Step-by-Step Instructions:
- Engage your core and squeeze your glutes to establish a solid, upright posture.
- Slowly press the band straight out in front of your chest. Resist the band's pull to twist toward the anchor.
- Once your arms are fully extended, slowly raise your arms upward toward the ceiling, keeping your trunk perfectly still.
- Lower your arms back to chest height, then pull your hands back in to your chest.
- Complete all repetitions, then switch sides and repeat.
Dosage: Perform 2 sets of 10 repetitions on each side, 3 to 4 times per week.
Tips & Common Mistakes: Do not let your body twist toward the anchor or arch your lower back as you raise your arms. Keep your shoulders down and away from your ears.
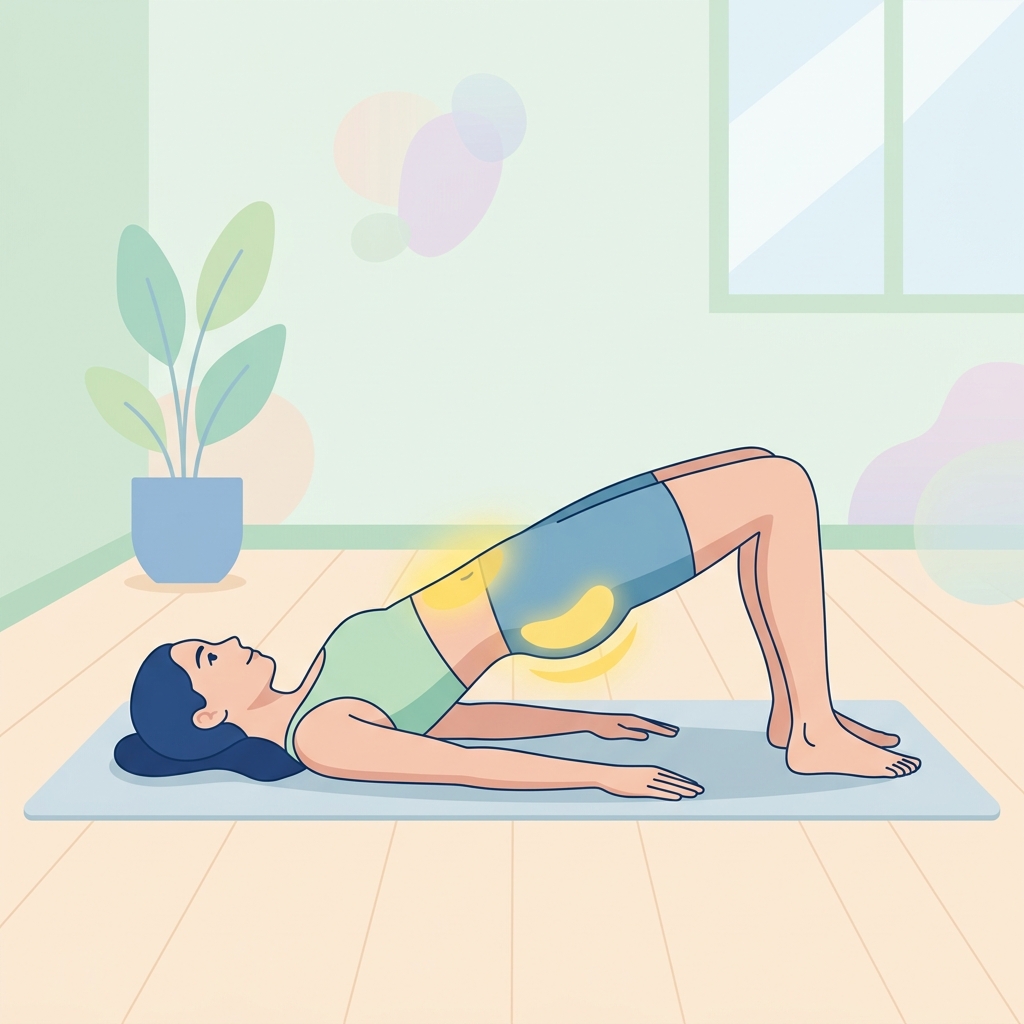
Exercise 2: Glute Bridge with Light Overhead Pullover
Purpose: Connects posterior chain activation (glutes and hamstrings) with shoulder stability and range of motion, reducing the force load on the rotator cuff.
Equipment Needed: A very light dumbbell (2-5 lbs) or a light resistance band.
Starting Position: Lie on your back with knees bent, feet flat on the floor hip-width apart. Hold the weight with both hands directly over your chest.
Step-by-Step Instructions:
- Squeeze your glutes and press through your heels to lift your hips into a straight bridge position. Do not arch your lower back.
- Maintaining the bridge and keeping your core tight, slowly lower the weight backward over your head toward the floor. Only go as far as comfortable without shoulder pain.
- Pause for a second, then squeeze your shoulder blades and use your back muscles to pull the weight back to the starting position above your chest.
- Lower your hips back to the floor. This completes one repetition.
Dosage: Perform 3 sets of 8 to 10 repetitions, 3 times per week.
Tips & Common Mistakes: Avoid letting your ribs flare or your lower back arch. The movement should come from the shoulders while the glutes and core remain locked in place.
Exercise 3: Single-Leg Balance with Scapular Pull-Apart
Purpose: Uses hip stability and balance to activate the stabilizers of the lower body, while training scapular retraction under light tension.
Equipment Needed: A light resistance band.
Starting Position: Stand tall holding the resistance band in both hands in front of your chest, arms straight. Raise one foot off the floor to balance on a single leg.
Step-by-Step Instructions:
- Find your balance on your standing leg. Keep a micro-bend in the knee and squeeze the glute of that leg.
- Keeping your arms straight, pull the band apart by squeezing your shoulder blades together until the band touches your chest.
- Slowly return your hands to the starting position with control.
- Maintain your balance on one leg throughout the set. If you lose balance, touch your foot down briefly and reset.
- Switch standing legs for the next set.
Dosage: Perform 3 sets of 10 to 12 repetitions (alternating standing leg each set), 3 to 4 times per week.
Tips & Common Mistakes: Do not shrug your shoulders. Keep your standing knee aligned over your toes; do not let it collapse inward.
Exercise 4: Modified Side Plank with Rotator Cuff Rotation
Purpose: Coordinates lateral hip stability (gluteus medius) and oblique strength with targeted rotator cuff activation.
Equipment Needed: A very light dumbbell (1-3 lbs) or a light resistance band.
Starting Position: Lie on your side, supporting your upper body on your forearm. Bend your knees to 90 degrees. Hold the light weight in your top hand, elbow bent to 90 degrees and tucked against your side.
Step-by-Step Instructions:
- Lift your hips off the floor, creating a straight line from your head to your knees (modified side plank).
- While holding the plank, slowly rotate your top hand toward the ceiling, keeping your elbow pinned to your side.
- Slowly lower the hand back to the starting position. Keep your hips raised high.
- Repeat for the target number of repetitions, then switch sides.
Dosage: Perform 2 sets of 10 repetitions on each side, 3 times per week.
Tips & Common Mistakes: Do not let your elbow drift away from your body. Keep your neck long and avoid sinking into your supporting shoulder.
Always consult with your physical therapist or doctor before starting a new exercise routine. If any exercise causes persistent pain or swelling, discontinue it and contact your healthcare provider.
Disclaimer: This guide provides general exercise instructions and is not a substitute for professional medical advice. Always consult your doctor or qualified healthcare provider with any questions you may have regarding your specific medical condition and treatment plan.

Related articles
Browse all articlesTrusted External Resources
Curated educational materials to help you make informed decisions about your orthopaedic bone & joint conditions.

Orthopaedia

Orthogate Patient Education